
You can breathe new life into your home through creative upcycling projects that transform everyday items into unique decor and functional pieces. Start by exploring your house for potential treasures like old furniture, mason jars, tin cans, and vintage crates. With basic tools like hammers, screwdrivers, and paint supplies, you'll be ready to tackle projects ranging from dresser-to-kitchen-island conversions to no-sew fabric art. Consider eco-friendly paint options and sustainable materials to make your projects environmentally conscious. Whether you're creating pallet furniture or wine bottle light fixtures, each project offers endless possibilities to showcase your creativity while reducing waste. The transformation of your living space begins with a single item's reimagining.
Finding Items to Upcycle
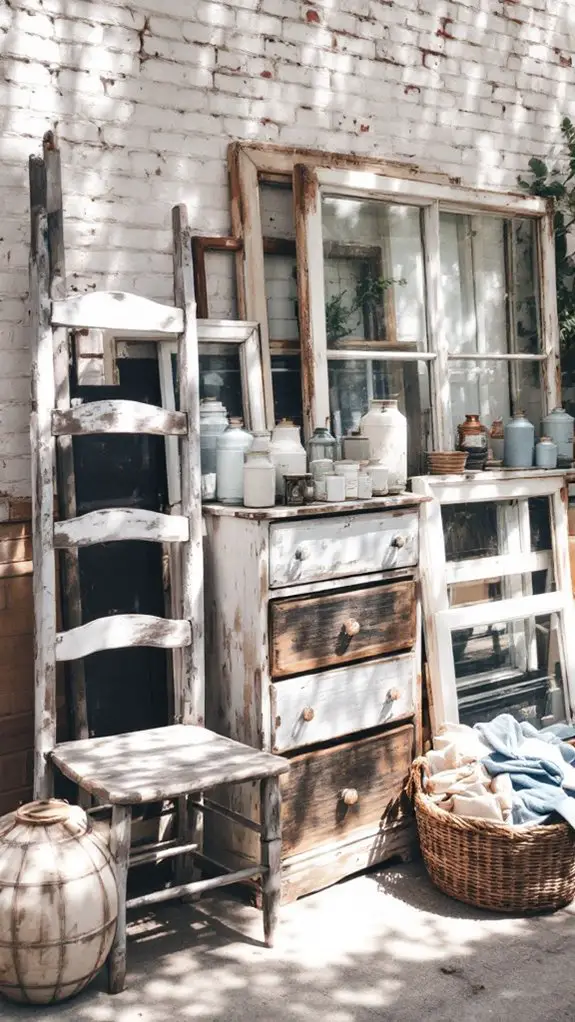
A treasure trove of upcycling possibilities exists right in your home. You'll find potential projects in every room, from old furniture pieces to everyday household items that you might otherwise discard. Start by looking at your furniture with fresh eyes – that dated dresser could become a stylish kitchen island, while wooden stools can transform into charming end tables. Visit your local thrift stores for additional inspiration and affordable finds.
Even those forgotten VHS cases can turn into industrial-style storage solutions.
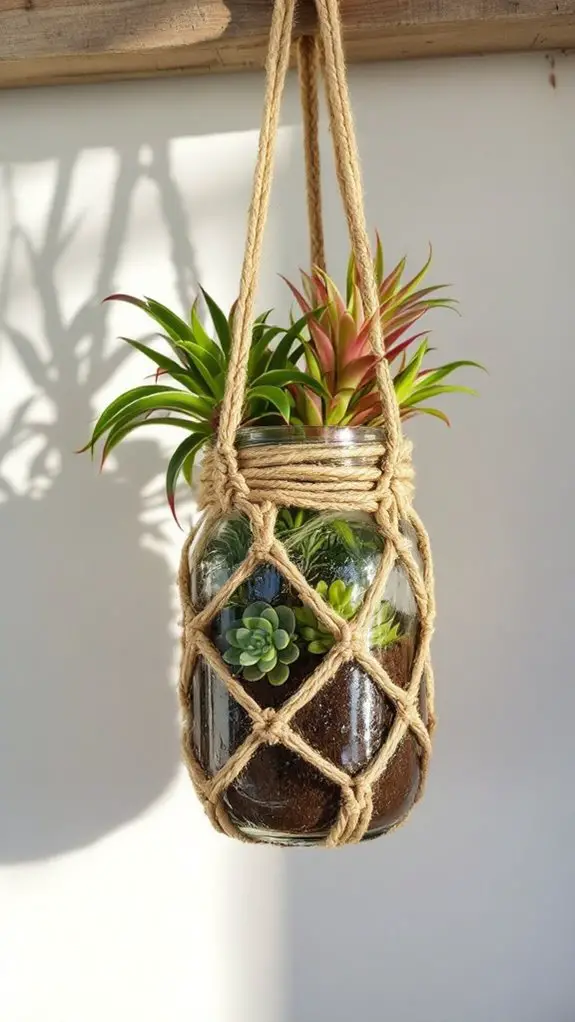
Don't overlook common household objects in your upcycling search. Mason jars offer versatile options for both decorative and practical purposes, while empty milk cartons can become creative planters for your herb garden.
Old light fixtures hold potential as unique pendant lamps, and vintage luggage pieces make distinctive coffee tables with built-in storage.
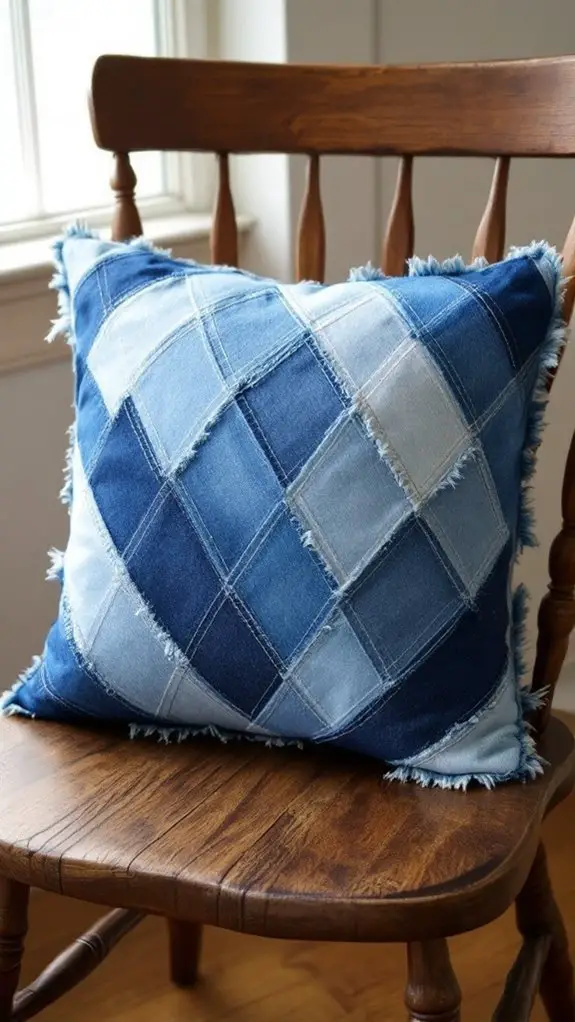
Your fabric items present numerous upcycling opportunities. Transform worn blankets into shower curtains or pet beds, and give old t-shirts new life as tote bags or quilts.
Even those faded dish towels can become attractive throw pillow covers, while old sheets work perfectly as garden weed barriers.
Look beyond conventional items for unexpected upcycling possibilities. Outdated books can serve as innovative knife blocks or artistic wall displays. Those scratched CDs you've kept in storage? They're perfect for craft projects or string dispensers.
Even pool noodles and mattress springs offer surprising potential – use them as cord organizers or plant holders.
Essential Tools and Materials
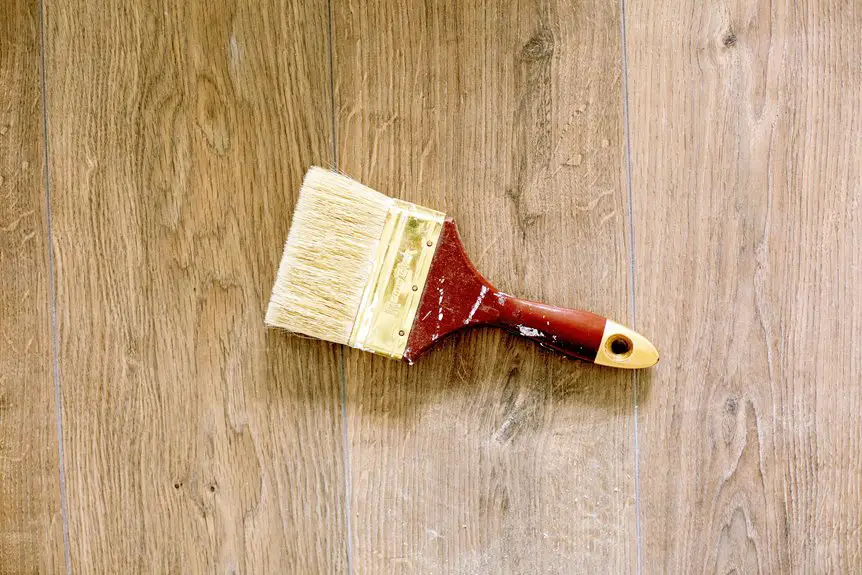
You'll need a mix of hand tools and power tools to start your upcycling journey, including essentials like hammers, screwdrivers, and an electric drill. Keep your workspace organized and efficient with toolboxes and carts to store and transport your supplies.
For paint options that are kinder to the environment, look for low-VOC or natural paints made from plant-based materials and minerals.
Don't forget to gather basic supplies like sandpaper, brushes, and cleaning cloths before starting any project.
Basic Equipment Checklist
Before diving into any upcycling project, it's vital to gather up the right tools and materials.
You'll need a core set of hand tools, including a versatile screwdriver set, pliers, wrench, utility knife, and sandpaper for basic repairs and surface preparation. A hacksaw will help you cut materials to size when needed. Proper tool storage solutions will keep your workspace organized and efficient.
For larger projects, you'll want to invest in essential power tools. A drill is indispensable for making holes and driving screws, while an electric sander will save you time on surface preparation. If you're planning to work with wood or metal, you'll benefit from a circular saw and impact driver.
Don't forget your painting and finishing supplies. You'll need paint strippers, brushes, and cloths for surface preparation and cleanup. A paint sprayer can be invaluable for larger pieces, while various stains and finishes will help you achieve your desired look.
Complete your toolkit with important accessories like a tape measure for precise measurements, protective gloves, and a hammer.
If you're planning fabric-based projects, a sewing machine will expand your creative possibilities. Keep cleaning materials on hand to maintain your workspace and tools.
Eco-friendly Paint Options
Now that you've gathered your basic tools, selecting the right paint becomes the next important step in your upcycling journey. For environmentally conscious projects, you'll want to focus on eco-friendly paint options that minimize harmful impacts while delivering excellent results.
Water-based paints offer a practical starting point, containing lower VOC levels and providing safer application. Consider zero-VOC options like Ecos or Clare if you're working indoors, as they won't release harmful chemicals into your space. Green Seal certification proves these paints meet rigorous environmental standards for sustainability.
For a truly natural approach, milk paints like Real Milk Paint provide a non-toxic alternative made from milk protein and earth pigments. When selecting your paint, look for certifications like GREENGUARD Gold or Green Wise to guarantee environmental standards.
You can also explore recycled paints, which are reprocessed from leftover materials while maintaining high quality. For texture variety, try clay and earth-based paints that create unique finishes using natural minerals.
Don't forget to pair your eco-friendly paint with sustainable practices. Use bamboo or recycled-material brushes, clean them immediately after use, and properly dispose of any leftover paint by drying it out or donating it to local organizations.
China Cabinet Transformation
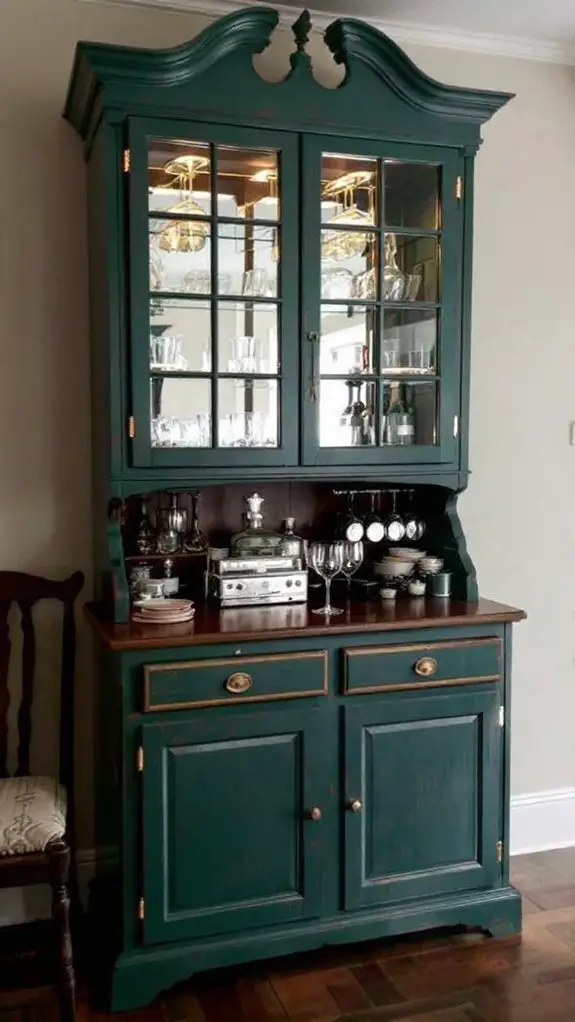
Transforming an old china cabinet opens up endless possibilities for creating a stunning focal point in your home. Before diving into the project, you'll need to measure your space carefully and select a solid-wood cabinet that fits your vision. Create a detailed plan, gather all necessary materials, and consider repurposing existing items to enhance your design.
Consider using hardware cloth inserts in place of glass panels for a modern twist while maintaining functionality. Start by thoroughly preparing the cabinet's surface through sanding and cleaning. You'll want to apply your chosen paint or stain using high-density rollers and brushes for the best coverage. Update the hardware with new knobs and handles that complement your design aesthetic.
For added personality, you can incorporate unique elements like wallpaper, stencils, or try techniques such as ombre or whitewashing.
When you're ready for assembly, position the cabinet in its designated location and secure it properly to the wall. If your design includes additional features like shelving, countertops, or plumbing components, install these carefully, making sure of precise measurements and proper fitting.
Don't forget to attach the hutch top section to wall studs for maximum stability.
Complete your transformation by sealing the paint with a clear coat or wax for durability. Replace old glass shelving with wooden alternatives if desired, and style the interior thoughtfully with your chosen items. Add decorative elements that enhance the overall look, whether you're displaying tableware, books, or accessories.
Before considering the project complete, perform a final inspection to verify everything is secure and functioning as intended.
Dresser to Kitchen Island
While china cabinets offer elegant storage solutions, old dressers can become functional kitchen islands that blend style with practicality. A successful upcycle project can create a unique conversation piece for your kitchen while reducing environmental waste.
Before starting your transformation, carefully assess your dresser's condition to verify it's sturdy enough for kitchen use. You'll need to remove unnecessary parts like the top and some drawers to create open storage spaces that work for your needs.
To strengthen the structure, frame the back with 1×4 boards and consider adding beadboard for both support and visual appeal. Choose a durable countertop material like butcher block or marble that can withstand daily kitchen activities.
Don't forget to maximize functionality by adding hooks, towel racks, or magnetic strips to the sides for extra storage.
You'll want to prep the surface properly by sanding down old finishes before applying high-quality paint or stain. If you're painting, bold colors can add personality to your kitchen, while staining highlights the natural wood grain.
Seal your work with clear or antique wax to protect against kitchen wear and tear.
Make your island mobile by installing casters on the legs, allowing you to move it wherever needed. Replace old hardware with new pulls that complement your kitchen's style.
Create open shelving for larger appliances and cookbooks, and repurpose old drawers for utensil storage.
Book Storage Solutions
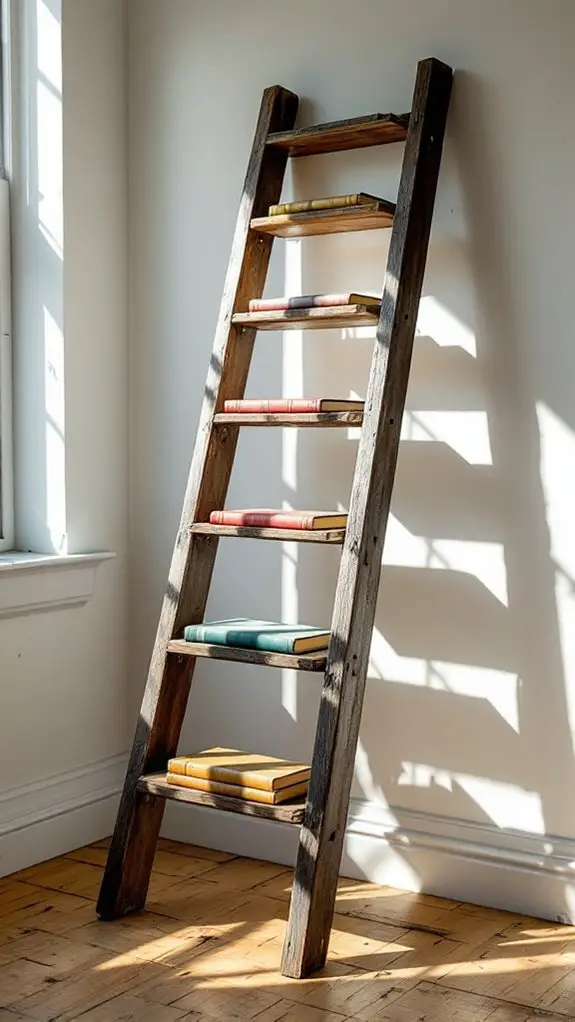
You'll love transforming vintage crates into charming bookshelves that add rustic character to any room while providing practical storage for your favorite reads.
By mounting these repurposed crates on your walls or stacking them creatively, you're creating unique book storage that doubles as eye-catching decor. This project lets you effectively conceal valuable items while maintaining an attractive bookshelf appearance.
For an extra touch of organization, you can craft hidden book nooks within larger crates, perfect for storing special collections or creating cozy reading spaces.
Vintage Crate Book Shelves
A vintage crate bookshelf offers both rustic charm and practical storage for your home library.
When selecting crates, look for square, unwarped pieces from retailers like Michaels or Home Depot, where you'll find standard sizes around 12.5 x 17.75 x 9.5 inches. You'll typically spend between $12 to $20 per crate, depending on quality and available discounts. With retailers like Michaels offering 40% off coupons, shopping during sales can significantly reduce your project costs.
Before assembly, you'll need to sand the crates thoroughly inside and out. Apply two coats of stain using a sponge brush, or opt for spray paint if you prefer a uniform finish.
When you're ready to build, start by connecting the bottom two crates, pre-drilling holes for screws to guarantee stability. Work your way up, adding extra support screws where needed.
Don't forget to secure your finished bookshelf to the wall using L brackets for safety, especially if you have children at home.
You can arrange the crates in various patterns to create unique designs that fit your space. Consider organizing your books by color for visual appeal, and add matching decorative pieces to complete the look.
This space-saving solution works particularly well for both small rooms and larger display areas.
Hidden Storage Book Nooks
Hidden storage book nooks transform ordinary shelving into clever hideaways for your treasured items and create cozy reading spaces in unexpected places. You'll find several creative approaches to crafting these secret storage solutions, from hollowing out multiple books to creating wooden boxes disguised with vintage book covers.
To create a multi-book secret compartment, select several books to hollow out, measure your desired storage space, and carefully cut through the pages. You can glue the books together for added stability. Community book sales provide an economical way to source your materials.
Alternatively, craft a wooden box and cover it with thrifted book covers, guaranteeing they bend naturally for an authentic appearance.
Integrate your hidden storage by utilizing space behind furniture, stacking books on the floor in artistic arrangements, or maximizing under-bed areas with rolling storage bins. Consider installing wall-mounted shelves or investing in furniture with built-in compartments to optimize your space while maintaining a clean aesthetic.
When designing your book nook, focus on blending it seamlessly with your environment. Choose materials that mimic real books, consider weight distribution, and verify easy accessibility.
You can separate sections by genre or theme to enhance organization while creating an inviting reading atmosphere.
Creative Tin Can Projects
Countless tin cans end up in recycling bins each week, but these versatile containers can be transformed into beautiful and practical home décor items.
You'll find that tin cans offer endless possibilities for upcycling projects that add character to your living space while promoting sustainability.
For your home decor needs, you can turn tin cans into elegant vases by painting them or covering them with decorative paper. Using acrylic or chalk paint provides the best adhesion and durability for long-lasting results.
Create ambient lighting by making candle holders and lanterns, perfect for both indoor and outdoor spaces.
If you're looking to add some music to your garden, transform different-sized cans into unique wind chimes.
Organization becomes easier with tin can solutions. Convert them into stylish holders for your desk supplies, makeup brushes, or craft materials.
You can paint them to match your room's color scheme or wrap them in fabric for a softer look. They're particularly useful for storing ribbons, twine, and other crafting essentials that tend to get tangled.
During holidays, tin cans become valuable crafting materials. Turn them into Christmas ornaments, seasonal planters, or festive lanterns.
You can even create miniature Easter baskets or incorporate them into distinctive holiday wreaths.
For garden enthusiasts, tin cans serve multiple purposes. Use them as plant markers, herb planters, or seed starters.
They make excellent bird feeders when properly weatherproofed, and you can create charming outdoor lanterns to illuminate your garden paths.
Textile Repurposing Ideas
You'll find endless possibilities for textile repurposing through creative rug making, where old t-shirts and fabric scraps can become beautiful braided or woven floor coverings. Make vibrant rugs by incorporating colorful larger scraps into traditional braided designs.
Your worn-out upholstered furniture can get a fresh look with no-sew techniques using fabric tucking and pinning methods, while saving you money on professional reupholstery.
Transform your blank walls into artistic displays by turning fabric scraps into striking wall art using embroidery hoops, quilting techniques, or fabric-covered canvas frames.
Creative Rug Making Techniques
Transform your old textiles into stunning rugs using a variety of creative techniques that blend traditional craftsmanship with modern innovation.
You'll find several methods to create unique floor coverings, from hand-tufting with a specialized gun to traditional hand-weaving on a loom. Hand-tufting offers a faster production method while maintaining high quality, making it perfect if you're looking to complete projects efficiently. The technique creates diverse textures and patterns with remarkable versatility.
For a more sustainable approach, you can upcycle old clothes into beautiful rugs. Your worn-out jeans and t-shirts can find new life through techniques like braiding, crocheting, or using no-sew knotting tools.
If you're interested in traditional methods, try hand-hooking, which creates distinctive rugs with a quirky, rounded style by pulling yarn through a foundation cloth. Alternatively, hand-weaving on a loom offers precise control over your design using vertical warp and horizontal weft yarns.
Each technique requires specific tools and materials, but they all provide opportunities for creative expression. Whether you're a beginner or experienced crafter, you'll find a method that matches your skill level while helping you transform recyclable materials into practical, personalized home décor pieces.
No-Sew Upholstery Projects
While rug making gives old textiles new life on your floors, no-sew upholstery projects let you breathe fresh air into tired furniture without threading a single needle.
You can transform worn-out benches and chairs using simple techniques like heat bond tape and stapling, creating professional-looking results with minimal tools. The durable Thomasville tweed fabric provides an excellent choice for long-lasting upholstery projects.
Start by cutting foam to match your furniture's measurements, layering pieces to achieve your desired thickness. Secure these layers with spray adhesive, and cover them with batting for a smooth surface.
When selecting fabric, consider repurposed materials like old blankets or clothing that match your decor. You'll want to attach the fabric using a staple gun, working from the sides toward the corners while keeping the surface taut and wrinkle-free.
For added flair, you can create coordinating no-sew pillows using iron-on sewing tape. This technique works perfectly for transforming old t-shirts or other textile scraps into stylish accent pieces.
The best part? These projects aren't just creative – they're environmentally conscious too. By repurposing existing materials, you'll reduce textile waste while developing valuable DIY skills and saving money on professional upholstery services.
Fabric Wall Art Tips
Through creative fabric repurposing, fabric wall art offers an artistic way to showcase cherished textiles and breathe new life into any room.
You'll want to start by selecting fabrics with varying textures and patterns, including vintage pieces like antique handkerchiefs or lace that add character to your design. Choose quilting cotton as your base material since it won't stretch, and mix busy patterns with simpler ones for visual interest. This craft project is perfect for all skill levels and can be completed quickly.
When creating your wall art, try layering different fabric strips for depth and dimension. You can secure them using decoupage glue or staples, depending on your desired finish. Consider adding embellishments like beads or embroidery to enhance specific areas.
For a professional look, wrap fabric tightly around a canvas or revamp old picture frames with your chosen textiles.
Before starting your project, gather essential tools like sharp scissors and appropriate adhesives. If you're working with vintage fabrics, repair any tears or frays first.
Don't forget to clean and prepare your frames thoroughly. You can also experiment with dyeing or painting fabrics to achieve the perfect color scheme that complements your home's décor.
Outdoor Garden Decor
Countless everyday items destined for the landfill can find new life as stunning outdoor garden decor. You'll be amazed at how materials like pallets, metal colanders, old ladders, and glass bottles can transform your outdoor space into a creative oasis.
By repurposing these common items, you're not just saving money but also reducing waste and adding unique character to your garden. For a sustainable touch, consider building bug hotels from scrap to support beneficial insects and garden biodiversity.
Start with simple projects like turning metal colanders into hanging planters – they're perfect since they already have built-in drainage. Old wooden pallets can become vertical planter boxes for your herbs and flowers, while vintage ladders make excellent plant stands or trellises for climbing vines.
Don't overlook mason jars, which you can easily convert into charming outdoor lanterns for evening ambiance.
Your garden's personality really shines through decorative elements. Transform old bowling balls into eye-catching gazing balls, or create whimsical fence flowers using colorful plastic party trays.
For practical touches, craft garden markers from upcycled materials like wood slices or cork. Metal items can find new purpose as artistic garden sculptures or decorative flowers.
Consider larger projects like outdoor furniture to maximize your garden's functionality. Turn pallets into comfortable benches or outdoor sofas, or repurpose old doors into unique garden tables.
Wicker furniture that's past its prime can become distinctive planters or decorative features. By combining different upcycled elements, you'll create a cohesive outdoor space that's both environmentally conscious and visually appealing.
Wine Bottle Light Fixtures
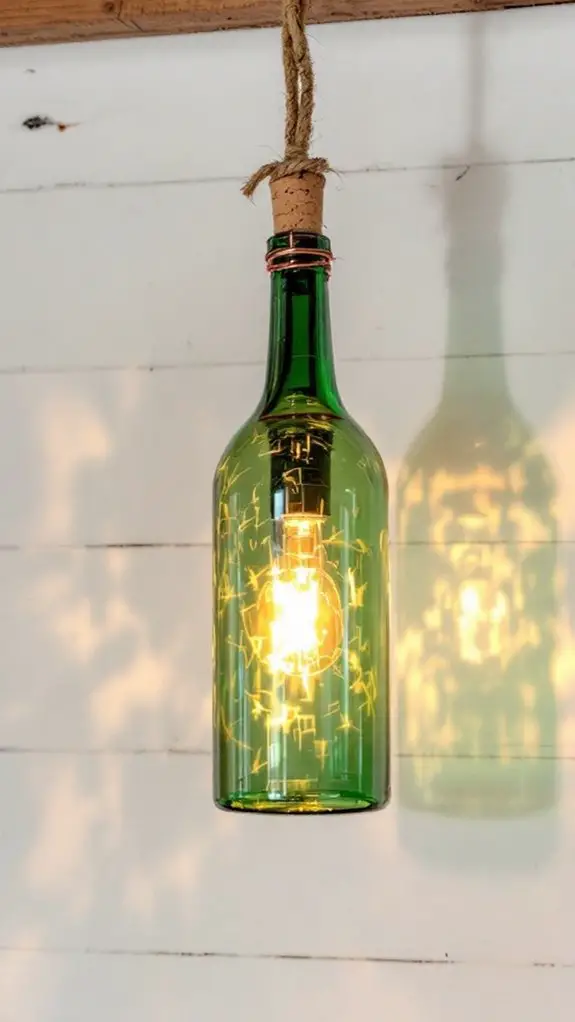
You'll find endless possibilities for transforming wine bottles into stunning light fixtures, from hanging pendants to table lamps that add character to any room.
When working with glass and electrical components, you'll need to prioritize safety by using proper tools, wearing protective gear, and following manufacturer guidelines for lamp kits and wiring. Start by removing bottle labels and thoroughly cleaning the glass surface.
Your bottles can be enhanced with decorative finishes like Mod Podge Sheer Colors or etched designs, creating unique pieces that reflect your personal style.
Creating Hanging Pendant Lights
Inside countless homes, empty wine bottles are finding new life as stunning pendant lights and chandeliers. To create your own, you'll need a clean wine bottle with the label removed, a pendant light kit with an E27 base socket, and the proper tools for cutting glass.
While there are several methods for cutting wine bottles, the most reliable approach is using a Generation Green Bottle Cutter. For expert guidance on selecting quality supplies, you can contact National Artcraft's specialists at their toll-free number. Though some attempt the acetone and string method, it's often unreliable and potentially dangerous. Once you've scored your bottle, you can create a clean break by alternating between hot and cold water.
After cutting, sand the edges smooth and insert your pendant light kit through the bottle. You'll want to make certain all electrical connections are secure, using crimp connectors for multiple-bottle fixtures and covering all connections with heat shrink wrap and electrical tape.
Wire your neutral wires together and connect everything to the junction box using wire nuts. For added personalization, you can tint your bottles using Mod Podge Sheer Colors.
Whether you're creating a single pendant or a multi-bottle chandelier, make sure your mounting hardware can support the weight and that all electrical work meets safety standards.
Bottle Lamp Safety Tips
While creating wine bottle light fixtures adds beauty to your home, safety must take priority throughout the process. Before you begin, inspect your bottle for any cracks or defects that could compromise its stability. Always work in a well-ventilated area and keep flammable materials far from your workspace. Using LED light bulbs helps ensure energy efficiency and reduces heat output.
When installing your bottle lamp, verify it's positioned on a stable, level surface where it can't be knocked over. If you're using liquid fuel, store it in its original container with a child-resistant closure, and keep it in a secure location away from the lamp.
Never leave a burning lamp unattended, and always extinguish it properly using the snuffer cover. You'll need to maintain your lamp regularly by cleaning all components to prevent residue buildup. Only use manufacturer-recommended fuels, and adjust the wick to achieve a steady, clean flame.
If you have children or pets, place the lamp on a high surface they can't reach, and teach children that these fixtures aren't toys. Keep a fire extinguisher nearby, and if a child accesses the fuel, contact poison control immediately. Remember to cap fuel containers tightly and store them safely before lighting your lamp.
Decorative Glass Finishes
Throughout the process of creating bottle light fixtures, decorative glass finishes can transform ordinary wine bottles into stunning lighting elements.
You'll find that Mod Podge mixed with food coloring offers an excellent way to add color to the inside of your bottles, creating a unique translucent effect when illuminated.
To achieve different lighting effects, you can choose between clear bottles for brighter illumination or colored bottles for a more subdued ambiance. Glass cutting tools are essential for carefully removing bottle bottoms to create the perfect opening for light fixtures.
When working with clear bottles, you'll want to thoroughly clean them first using white vinegar and soap, ensuring all labels are removed before applying any decorative finishes.
You can create intricate designs using paintbrushes and wax paper, while Mod Podge Sheer Colors allow you to layer different hues for depth and visual interest.
Don't limit yourself to single-color schemes – try combining multiple bottles in various colors to create an eye-catching arrangement.
For added personality, you can incorporate different bottle types or preserve the original cork as a decorative element.
Remember that the finish you choose will affect how light disperses through the bottle, so consider testing your design with a light source before final installation.
Pallet Furniture Projects
Pallet furniture has emerged as a sustainable and budget-friendly way to create custom pieces for your home. With the right tools and some creativity, you'll find that pallets can be transformed into everything from coffee tables to outdoor sofas. Before starting any project, make certain to select pallets that are dry, unstained, and free from harmful chemical treatments like MB or SF.
You can start with simple projects like a coffee table featuring wheels for mobility or a fold-up wall desk that saves space. For outdoor spaces, consider building a patio set using stacked pallets and weather-resistant wood panels, or create a cozy porch swing using pallets, chains, and cushions. A hairpin legs dining table provides a modern twist on traditional pallet furniture.
If you're looking to maximize storage, try constructing a sectional sofa with double-layered pallets that provide built-in storage compartments.
To guarantee successful construction, you'll need basic tools including a pry bar, hammer, cordless drill, and saw. Begin by carefully disassembling the pallets and sanding any rough spots to prevent splinters.
You can enhance your pieces with decorative elements like chevron patterns made from differently colored pallet boards or add functionality with features like built-in book storage.
For finishing touches, protect your furniture by applying paint or stain. You might choose to create a rustic look with dry-brushed techniques and wax sealing, or opt for a modern farmhouse style by combining pallet wood with industrial elements like metal legs.
Don't forget to add comfort with cushions, textiles, or tatami mats for seating pieces.
No-Sew Home Decor
Creating beautiful home decor doesn't require advanced sewing skills or expensive equipment. With no-sew techniques and some adhesive materials, you can transform ordinary fabrics into stunning decorative pieces for your home.
Start with simple projects like pillow covers using Heat n Bond adhesive tape. You'll need to iron your chosen fabric, cut it to size, and fold the edges before securing them with the tape. Add velcro strips to make the covers removable and washable. For more pillow options, you can upcycle old throw pillows by giving them new inserts and fresh covers. Craft supplies are readily available at local stores for all skill levels.
Transform your windows with no-sew curtains made from repurposed drop cloths or tablecloths. Create cafe-style curtains for a budget-friendly update, or turn old fabric into unique lampshade covers. You can also make a vintage flag banner using fabric scraps and adhesive tape for added wall interest.
Don't overlook everyday items that can be upcycled. Turn old dish towels and pillowcases into decorative pieces, or convert a tablecloth into an elegant table runner using adhesive tape. Create custom fabric napkins from remnants, or cover picture frames with fabric using spray adhesive for a coordinated look.
For larger impact, consider creating large-scale wall art using fabric as your medium. You can also fashion practical items like no-sew kindle covers from old jeans or create a decorative book hammock to display your favorite reads.
These creative solutions let you personalize your space while giving new life to existing materials.
Mirror Makeover Techniques
A simple mirror makeover can dramatically transform your living space without breaking the bank. You'll find several effective techniques to breathe new life into old mirrors, from fabric wrapping to creative painting approaches.
For fabric-wrapped frames, start by selecting a thick, durable fabric and quality adhesive. This beginner-friendly project can be completed in about an hour. Cut your fabric to size, making a hole in the center to prevent bubbling, and carefully wrap it around the frame.
Don't forget to cover the back to prevent mirror reflection, and consider using printed patterns for round mirrors to conceal any imperfections.
If you're looking to add spring vibrancy, transform your mirror frame with spray paint in cheerful yellows, pinks, or greens. Before painting, thoroughly clean and sand the surface for best paint adhesion.
Apply multiple coats to achieve rich, lasting color that makes your mirror a striking focal point.
You can create unique frames using unexpected materials. Transform metal frames with Woodubend for a faux wood appearance, or construct a window pane-style mirror using small rectangular mirrors and plywood.
For a modern twist, try incorporating holographic vinyl sheets or repurpose old stair spindles into an eye-catching frame design.
To achieve an antique finish, combine water, vinegar, and bleach for an aged effect. You'll want to sand the frame first, then apply chalk paint and wax for authentic vintage appeal.
Add dimension with silicone bead trim, and layer multiple coats of stain or paint until you achieve the desired antique look.
Filing Cabinet Design Ideas
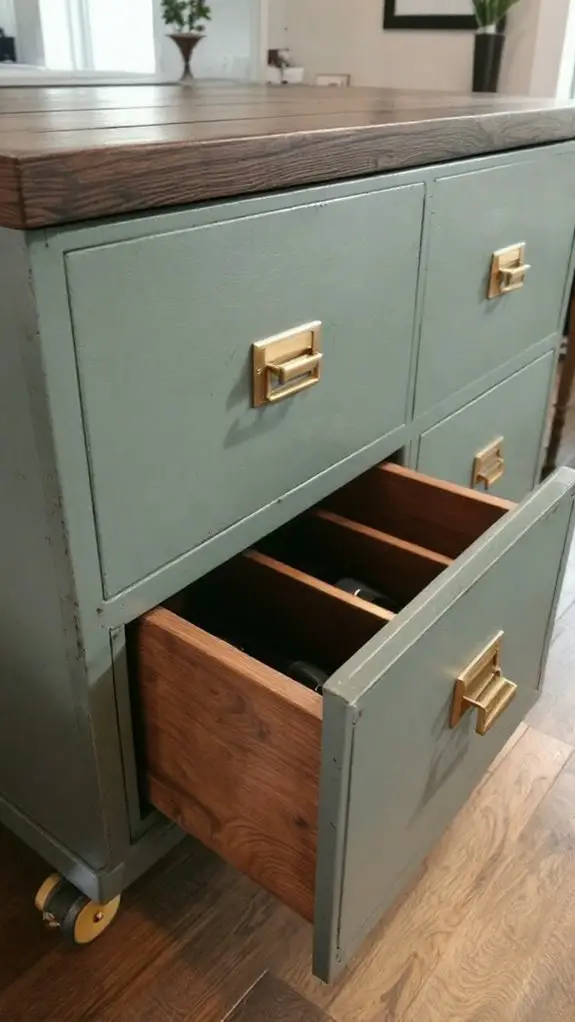
When you're ready to transform an outdated filing cabinet, you'll discover countless creative possibilities for breathing new life into this versatile piece of office furniture.
One popular option is creating a custom desk by using two filing cabinets as the base and adding a wooden top. You'll need to secure the top with additional wooden strips for support, including a 2" center strip to prevent sagging and a 3" wall mount for stability. Old cabinets can often be found at recycling centers for minimal cost.
If you're looking to enhance storage functionality, start by cleaning and painting the cabinet for a fresh appearance.
Add castors to make it mobile, and install wooden dividers or cubbies inside the drawers. You can personalize it further with decorative label pulls and stencils to match your space's aesthetic.
For furniture repurposing, transform your filing cabinet into a side table by adding a wooden top and decorative trim.
Alternatively, flip it horizontally to create a foyer bench – just add cushions for comfort. You can also convert it into a craft organizer or portable laundry bin by installing locking casters.
Don't limit yourself to indoor projects – filing cabinets make excellent outdoor planters.
Remove the drawers, add drainage holes, and fill with soil and plants. Make sure to apply weather-resistant paint or finish to protect against the elements.
You can also repurpose it for garage tool storage or create an outdoor work surface by adding a durable top. Complete the look with custom stencils or decals for added visual interest.
Door Upcycling Projects
Transforming old doors into stunning home décor pieces starts with proper preparation and planning. Before you begin any upcycling project, thoroughly clean your door and evaluate its condition.
You'll need to repair any damage and fill holes with wood filler before moving forward with your transformation. The Liming Wax finish adds beautiful dimension and a weathered appearance to your project.
For a simple yet effective makeover, you can sand the door and apply a fresh coat of paint. Start with a quality primer like Zinsser Bull's Eye 123, then follow with your chosen paint finish – whether it's satinwood or gloss. Remember to sand lightly between coats for the smoothest results.
To add visual interest, you can create a paneled effect using astragal mouldings secured with wood glue.
You've got numerous options for repurposing your old door. Transform it into a practical coat rack by adding hooks, or create a space-saving folding table for your laundry room.
If you're looking for bedroom furniture, you can convert the door into a unique headboard. For outdoor projects, consider turning it into a picnic table, garden bed, or porch swing.
When working with mouldings, you'll need a saw or mitre block to cut them to size. Don't forget to use caulk to fill any gaps and create clean edges.
Eco-Friendly Planters
Creating eco-friendly planters through upcycling offers endless possibilities for both indoor and outdoor gardening. You'll find that common household items can easily transform into unique planters while helping reduce waste and save money. From tin cans and plastic bottles to old boots and colanders, you've likely got several potential planters already in your home.
Kitchen items make excellent planters with minimal modification. You can turn tin cans into charming containers by adding drainage holes and applying paint, while plastic food containers often come with built-in drainage. Don't overlook items like teapots and coffee mugs, which can house small herbs or succulents perfectly. Baking tins can be transformed into creative vertical gardens perfect for growing herbs.
For seedlings, eggshells and egg cartons provide biodegradable options that you can plant directly into your garden.
If you're looking to expand your garden, consider larger items like laundry baskets for growing potatoes or old baskets lined with plastic for flowering plants. Pallets can become vertical gardens, while vintage items such as wash tubs and watering cans add character to your outdoor space.
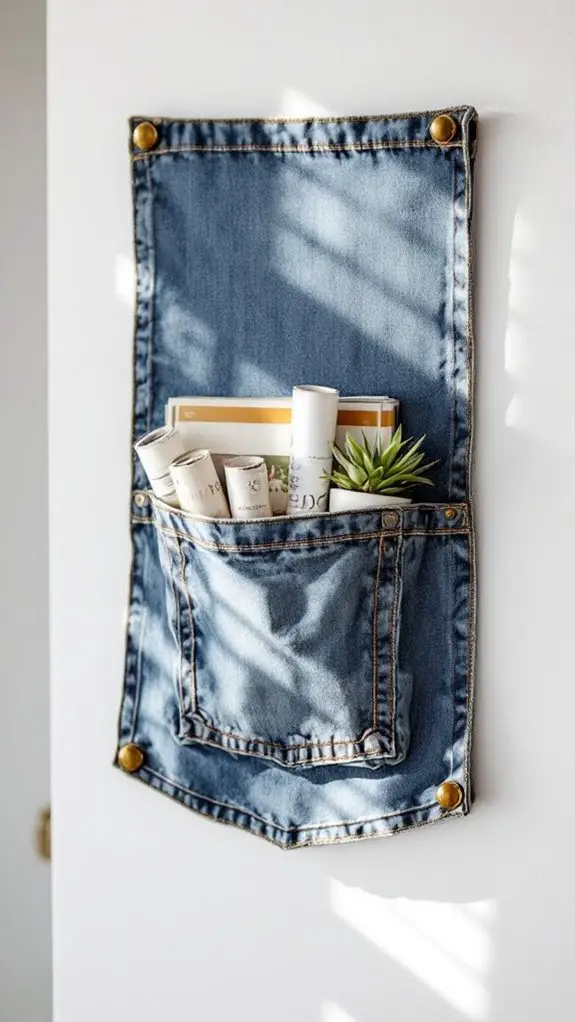
You can even repurpose jean pockets into hanging planters for a truly unique display.
Remember to guarantee proper drainage in your upcycled planters by drilling or punching holes where needed. Many of these materials prove surprisingly durable, especially tin cans and plastic bottles.

Erzsebet Frey (Eli Frey) is an ecologist and online entrepreneur with a Master of Science in Ecology from the University of Belgrade. Originally from Serbia, she has lived in Sri Lanka since 2017. Eli has worked internationally in countries like Oman, Brazil, Germany, and Sri Lanka. In 2018, she expanded into SEO and blogging, completing courses from UC Davis and Edinburgh. Eli has founded multiple websites focused on biology, ecology, environmental science, sustainable and simple living, and outdoor activities. She enjoys creating nature and simple living videos on YouTube and participates in speleology, diving, and hiking.